Day Hike Checklist for Beginners
A practical beginner checklist for packing the Ten Essentials, planning your route, checking weather, and leaving the trailhead prepared.
June 16, 2026 / 13 min read
TLDR
- A good day hike checklist starts with the Ten Essentials: navigation, sun protection, insulation, illumination, first aid, fire, repair items, food, water, and emergency shelter.
- Pack for the route you are actually hiking, not the version you hope for: distance, elevation, weather, daylight, trail conditions, water access, and cell service all change the checklist.
- For beginners, the biggest misses are usually too little water, no rain or warm layer, no headlamp, no offline map, and no plan for trash, bathroom needs, or a delayed return.
- Lay out your kit before leaving, test anything new at home, and save route notes, trailhead details, weather, and backup plans with the trip so the whole group has the same information.
- Treat the checklist as a habit, not a shopping list. A shorter local hike can still need essentials if weather changes, the trail is confusing, or someone gets hurt.
What belongs on a day hike checklist
A day hike sounds simple: pick a trail, bring water, walk out and back. That simplicity is part of the appeal, but it is also why beginners often underpack. The trail may be longer than expected, the parking area may have no service, afternoon weather may arrive early, or a small blister may turn the last mile into a slow walk.
The best day hike checklist is not a pile of expensive gear. It is a repeatable way to answer a few practical questions before you leave: where are we going, how long might it take, what happens if the plan changes, and what do we need to stay safe and comfortable until we return?
Outdoor organizations usually anchor day hiking gear around the Ten Essentials. The National Park Service describes them as items that can help with minor injuries, sudden weather changes, and unexpected emergencies. Washington Trails Association, American Hiking Society, and many park-specific hiking pages use the same basic categories because they cover the common ways a short hike becomes harder than planned.
Start with the route, not the gear
Before you pack, define the hike. Write down the trail name, trailhead, distance, elevation gain, highest point, expected surface, water crossings, exposure, parking situation, dog rules, permit or pass requirements, and the latest time you should turn around. A two-mile shaded loop near town and an eight-mile ridge hike in wind need very different versions of the same checklist.
Check whether the trail is open, whether a road closure affects the trailhead, and whether the route crosses land with special rules. If the hike is in a national park, national forest, state park, local open space, or managed preserve, use the official page first. Social posts and map comments can help you understand conditions, but they should not be your only source for closures, permits, seasonal rules, or safety alerts.
This is where planning and packing overlap. If the route has no reliable water, water moves higher on the checklist. If the trail is exposed, sun protection matters more. If the trail is easy to miss under snow or leaves, navigation matters more. If the hike could finish near dusk, a headlamp is not optional just because the plan says daytime.
Save the plan before you lose service
Do not assume your phone will load the trail map at the trailhead. Save the route, map, trailhead directions, parking notes, weather, and emergency contact information before leaving home. If you are hiking with other people, share the same plan instead of relying on one person to remember everything.
Campora works well for this part of the trip because a hike is more than a map pin. Keep the trailhead, route notes, permits or passes, photos of signs, weather checks, and backup plan together with the trip. After the hike, those same notes help you remember what worked for the next outing.
Pack the Ten Essentials in beginner-friendly terms
The Ten Essentials can sound like a mountaineering checklist, but for a beginner day hike they are best understood as simple systems. You need a way to navigate, protect yourself from sun, stay warm and dry, see in the dark, handle small injuries, make emergency fire if appropriate, fix small problems, eat, drink, and shelter yourself if you are delayed.
For navigation, bring a downloaded map and a paper backup when the trail is remote, confusing, or unfamiliar. A phone is useful, but batteries die and screens break. Know how to identify the trailhead, major junctions, your turnaround point, and your return route before you start walking.
For sun protection, bring sunglasses, sunscreen, a brimmed hat, and clothing that covers exposed skin when the route is open or high elevation. Cloud cover does not remove UV exposure, and snow, sand, rock, and water can reflect light back at you.
For insulation, bring a layer you are not already wearing. A light rain shell, fleece, puffy, beanie, or gloves can make a slow break or windy overlook comfortable instead of risky. Choose layers for the coldest realistic part of the day, not the temperature in the parking lot.
For illumination, bring a headlamp or small flashlight. Your phone light is a poor substitute because it drains the device you may need for navigation or communication. A short hike can turn dark if someone gets hurt, the trail takes longer than expected, or you stop for sunset and misjudge the return.
For first aid, carry a small kit you understand. At minimum, think blisters, cuts, scrapes, pain, allergies, and personal medication. A sealed kit you have never opened is better than nothing, but it is not as useful as a simple kit you have checked, restocked, and know how to use.
For fire, repair, food, water, and shelter, scale the items to the hike and the rules. A lighter or storm matches can be appropriate in many places, but fire restrictions may limit what you can use. Repair items can be as simple as tape, a small knife or multitool, and a spare buckle or cord. Food should include extra calories beyond lunch. Water should cover the full hike plus delays. Emergency shelter can be a light bivy, space blanket, or other compact item that helps you stay warmer if you have to wait.
Water and snacks: plan the boring part carefully
Most day hike problems are not dramatic. They are small discomforts that stack up: thirst, headache, low energy, cramps, and poor decisions near the end of the trail. Water and food are boring until you do not have enough.
For a mild, short trail, two bottles may be enough. For heat, altitude, direct sun, long climbs, children, dogs, or slow hikers, you may need much more. American Hiking Society gives a common planning guideline of about half a liter of water per hour in moderate temperatures and terrain, but the correct amount depends on your body, weather, exertion, and whether water can be treated on route.
Carry snacks that survive heat and being crushed. Trail mix, bars, dried fruit, tortillas, jerky, crackers, cheese, candy, and salty snacks all work. Bring more than you plan to eat, especially if the hike is remote or your group includes kids. If someone gets tired, cold, or irritable, a short snack break can change the rest of the hike.
Bring a trash plan
A checklist should include what leaves the trail with you. Pack a small resealable bag for wrappers, orange peels, tissues, dog waste where allowed, and any small trash you find. Leave No Trace emphasizes planning ahead because poor preparation often creates avoidable impact. A trash bag is light, cheap, and easy to forget until you need it.
Clothing: dress for motion and waiting
Beginner hikers often dress for the first ten minutes of movement. That can work on an easy town trail, but it fails when the route gets windy, you stop for lunch, rain moves in, or someone needs a long break. Dress for motion and waiting.
Use comfortable socks and footwear with enough grip for the trail. You do not need heavy boots for every day hike, but you do need shoes that fit, protect your feet, and handle the surface. Try new shoes on short walks before a longer hike. Add blister supplies if your footwear is new or the route is long.
Avoid relying on cotton for cold or wet conditions because it holds moisture and can chill you when you stop. A practical day hike clothing system might be a breathable shirt, comfortable hiking pants or shorts, warm layer, rain shell, hat, sunglasses, and dry socks in the pack. In desert or alpine sun, long sleeves and a hat may be more comfortable than exposed skin.
Pack for the return, not only the summit
The coldest part of a day hike can happen after the high point, when sweat cools, wind picks up, and the group is tired. Keep one warm or dry layer easy to reach. If the route has a big viewpoint, lake, pass, or lunch stop, assume you will stand around longer than planned.
Safety items beginners forget
A checklist gets stronger when it includes the unglamorous items that solve common trail problems. Bring a small first-aid kit, blister care, any personal medications, a headlamp, a whistle, identification, an emergency contact card, a power bank for longer hikes, and a way to keep key items dry.
Tell someone where you are going and when you expect to be back, especially if you are hiking alone or on a trail with unreliable service. If your plan changes at the trailhead, update them before you lose signal. If you are in a park or managed area, check whether there are specific safety warnings for heat, snow, wildlife, creek crossings, cliffs, or seasonal hazards.
Think about bathroom needs before you start. Some trailheads have no toilets, and some areas require packing out toilet paper or human waste. Bring the right bags and hygiene supplies for the place you are visiting. This is not only etiquette; it keeps trails, water, and wildlife healthier.
Match the checklist to weather and season
Weather changes the checklist more than distance does. A short exposed hike in heat can require more water, sun protection, and an earlier start than a longer shaded walk. A short shoulder-season hike can require traction, gloves, a warm layer, and a hard turnaround time because the trail gets icy in the shade.
Check the forecast close to departure and look for the trail's actual elevation when possible. A nearby town forecast may be warmer, calmer, and drier than the ridge or canyon where you plan to hike. In summer, pay attention to heat, thunderstorms, smoke, and afternoon wind. In spring and fall, look for lingering snow, mud, high creek crossings, and early darkness. In winter, beginner day hikes can quickly become snow travel if the route is not chosen carefully.
If the weather makes the checklist feel too heavy or complicated, choose a simpler hike. There is no prize for forcing a beginner route into conditions that require skills or equipment you do not have yet.
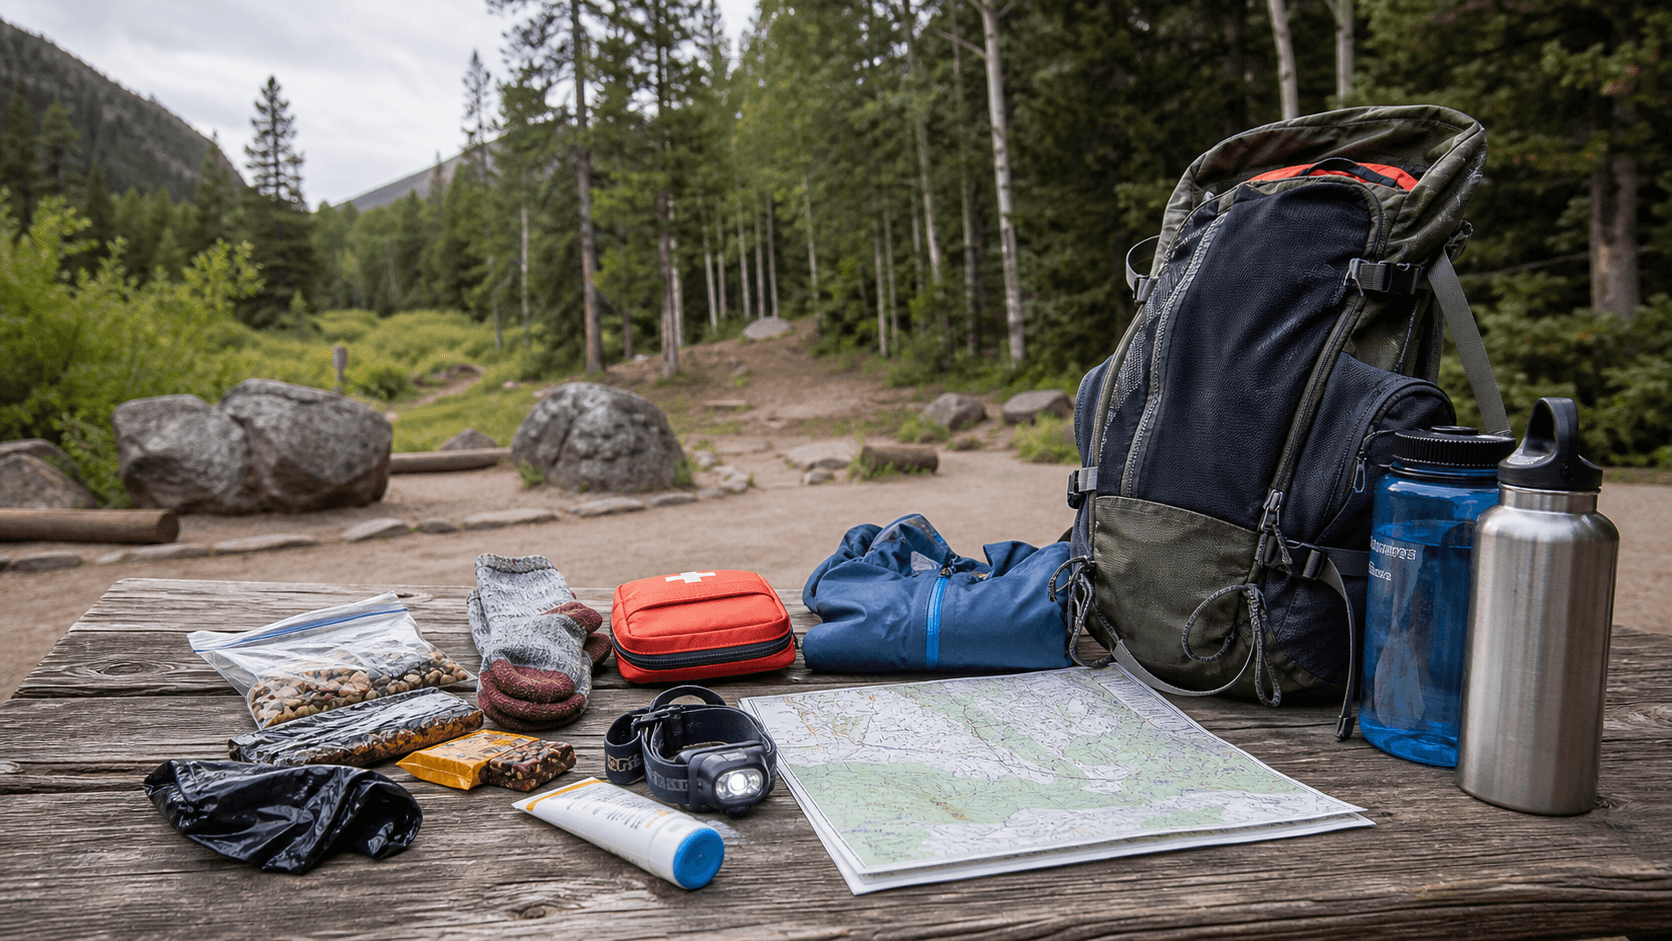
Lay everything out before it goes in the pack
The easiest way to use a checklist is to lay the gear out where you can see it. Group items by system: navigation, water, food, clothing, light, first aid, repair, emergency, hygiene, permits, and personal items. Then pack the items you will need soonest where they are easy to reach.
Put rain gear, snacks, map, sunscreen, and headlamp near the top or in outer pockets. Keep water reachable without unpacking the bag. Protect paper maps, extra layers, and first-aid items from rain or leaking bottles. If you are hiking with a group, split shared items deliberately instead of assuming someone else packed them.
Test anything new before the hike. Turn on the headlamp. Open the first-aid kit. Fill the water filter. Download the map and switch your phone to airplane mode to confirm it still loads. Try the pack with weight in it. A day hike is a good place to build systems before bigger backpacking, camping, or road-trip routes.
A practical beginner day hike checklist
Use this checklist as a starting point, then adjust for your route, season, group, and local rules. Navigation: downloaded map, paper map when appropriate, route notes, trailhead directions, and backup route. Water: enough for the full hike and delays, plus treatment if you plan to refill. Food: lunch or snacks, plus extra calories. Clothing: weather-appropriate layers, rain or wind shell, hat, sunglasses, and suitable footwear.
Safety and emergency: first-aid kit, blister care, personal medications, headlamp, whistle, fire starter where legal and appropriate, emergency shelter or space blanket, small repair kit, knife or multitool, power bank for longer outings, and identification. Sun and bug protection: sunscreen, lip balm, insect repellent when needed, and protective clothing. Hygiene and impact: toilet kit if needed, hand sanitizer, trash bag, dog waste bags when hiking with a dog, and any required permits or passes.
Before leaving: check trail status, road access, weather, daylight, local alerts, parking, pet rules, and water availability. Tell someone the plan. Save the route and key notes offline. Choose a turnaround time. If something important is missing, either get it, shorten the hike, pick a less exposed trail, or go another day.
Make the checklist easier after the hike
The best checklist improves after each trip. When you get home, note what you used, what stayed buried, what you wished you had, how much water was left, which layers worked, and whether the trail took longer than expected. Save those notes with the hike while the details are fresh.
This is where remembering past trips helps planning the next one. A photo of the packed table, a note about how muddy the trail was, or a reminder that the overlook was windy can make the next checklist faster and more accurate. Campora is built around that before, during, and after loop: plan the hike, track what happened, and remember the details that make the next trip easier.
A beginner day hike checklist should never feel like a barrier to going outside. It should make the trailhead calmer. Once the essentials are packed and the plan is saved, you can focus on the hike instead of wondering what you forgot.
Sources
More Campora Guides
View allJuly 21, 2026
How to Store Food While Camping in Bear Country
A beginner-friendly workflow for bear country food storage, scented items, coolers, canisters, lockers, campsite cleanup, and local rules.
July 14, 2026
Types of Camping Knives and What Each One Is For
Learn the main types of camping knives, what each one is best for, and how to choose a safer camp blade for cooking, repairs, and trail use.
June 30, 2026
Camping Food List for Beginners: What to Pack
Build a simple beginner camping food list with easy meals, safe cooler packing, water planning, snacks, cleanup, and wildlife-safe storage.